Screaming Frog Beginner’s Guide Contents
Getting Started with Screaming Frog
> Running a Crawl
> User Interface
> Investigating Warnings & Issues
> > Common Issues to Look For
Configuring your Screaming Frog
> UX (User Experience)
> Configuration
> > Saving Configurations
> Crawl Modes
> > Spider Mode
> > List Mode
> > SERP Mode
> > Compare Mode
Useful Things to Discover with Screaming Frog
> Spelling & Grammar Checks
> > Configuring Spelling & Grammar Checks
> > Running Spelling & Grammar Checks
> Duplicates & Near Duplicates
What is Screaming Frog?
Screaming Frog is a website crawler tool that can be used to improve your SEO, based on the information discovered through the tool. You can run a crawl on any website and gain access to loads of technical data that you can then use to improve your website, from identifying broken links to identifying duplicate content.
The tool can be downloaded for free directly from the Screaming Frog website.
Once the tool is downloaded, you have the option to pay for the unrestricted, licensed version. The free version allows you to crawl up to 500 URLs, and access all of the main features such as finding broken links, errors & redirects, analysing page titles and meta descriptions, generating XML sitemaps, and many more features.
The paid version allows you to crawl an unlimited amount of URLs (depending on your device’s allocated memory and storage) and access a whole lot more functionality around scheduling and saving crawls, configuration, and integrations with other data sources such as Google Search Console and Google Analytics.
This guide will take you through running your first crawl in the Screaming Frog SEO Spider. It’ll then cover some tips for things to look out for in your issues list, and then take you through the configuration of settings and user interface. We’ll then talk through the different crawl modes and how each of these has its uses, before wrapping up with a few useful features of the SEO Spider.
Getting Started with Screaming Frog
This tool may look complicated and overwhelming at first, but once you’ve understood the basics, it’s a breeze to use. After you have downloaded the software (and optionally, paid for the full version), you can run your first crawl.
The crawl works in a similar manner to Google’s search engine crawler bots, which is how websites are discovered and indexed, allowing their pages to show up in the Search Engine Results Pages, or SERPs. You can find out more about how this works in Google’s Search Central Documentation.
Screaming Frog allows you to view your site in the way that a search engine would, allowing you to action any issues or warnings which will ultimately improve your website rankings over time.
Running a Crawl
Running a crawl is easy. Simply copy the website URL that you wish to crawl, such as https://www.successlocal.co.uk/, and paste it into the search bar that shows ‘Enter URL to spider’. Click ‘Start’ and wait for the crawl to finish!
As the crawl is running, you will start to see information populating in various areas of the screen. You will know when a crawl is finished by the green progress bar in the top-right corner, as well as the breakdown of pages completed in the bottom-right corner.
The crawl settings are highly configurable, allowing you much more control over the data that is returned. More on the configuration in the next section, but first, let’s take a closer look at the user interface, and what all of this information actually means.
User Interface
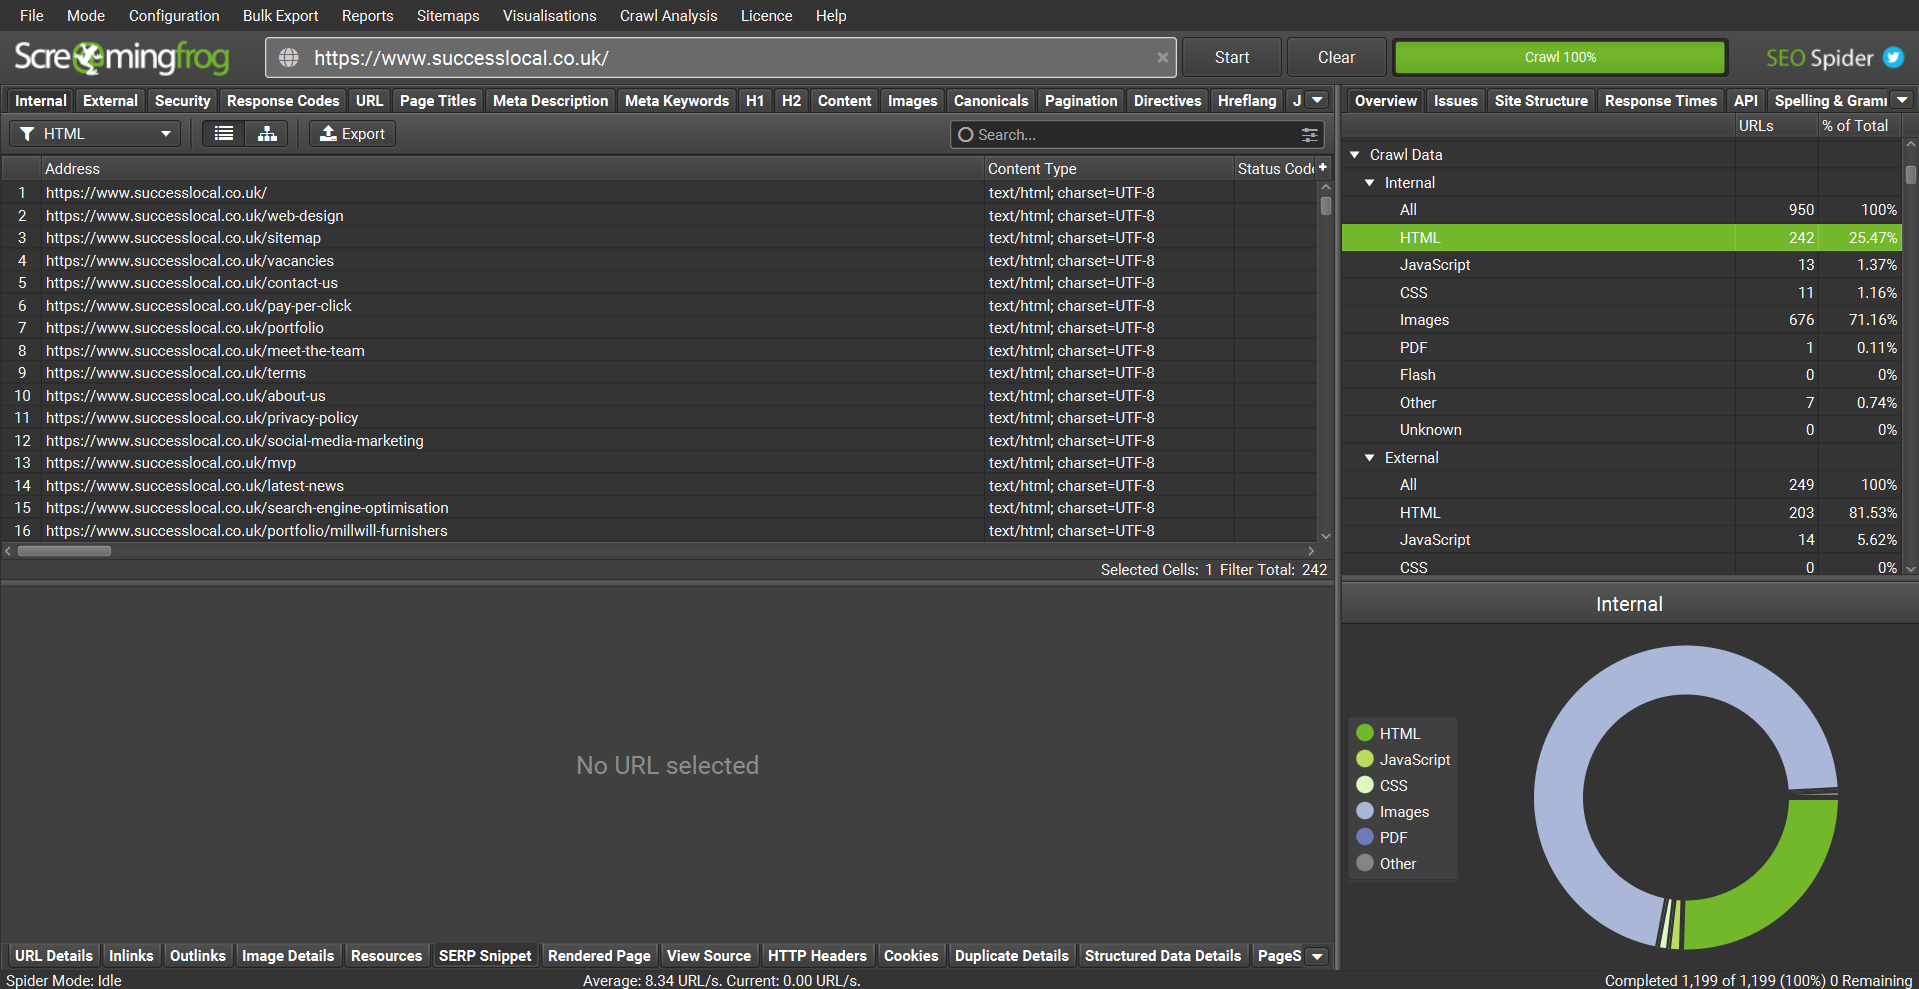
The user interface is largely divided into four main panes that show the data in different ways.

The main left-hand window shows the majority of data in list form. You will see here that there are lots of tabs that run along the top of the screen. Each tab contains its own set of data, shown across numerous columns. There are filters under each set of tabs that allow you to break down the data even further. For example, in the ‘Internal’ tab, you can filter the data based on whether the URLs shown are HTML, JavaScript, CSS, Images, and so on.
When you click on a row of data within the top-left pane, further details will appear in the bottom-left pane, relating to the row you have selected. You will also see that there is a row of tabs right at the bottom of the screen. By clicking on a URL in the top-left pane, and then selecting ‘Inlinks’ in the bottom-left pane, you will be able to see all URLs that link to that particular page from all across the website.
On the right-hand side, we can see summaries of the data. The top-right pane also has a set of tabs that run along the top. The most commonly used tabs are ‘Overview’ and ‘Issues’. The bottom-right pane shows graphical interpretations of the data. Once a crawl has been completed, this graph can show you the visual breakdown of the percentage split of the types of URLs, such as HTML, JavaScript, images, and so on.
The Overview tab within the top-right shows an overall summary of the URLs crawled and then presents a broken-down summary of the crawl data based on their categories. Each of the categories within this overview tab correlates to the tabs along the top of the top-left pane. Within these categories, you will see that the list of subcategories matches with the filters that are available within the top-left pane, and by clicking on each row, it automatically filters the data in the top-left pane to match.
We’ll dive deeper into configuring the user interface in the next section.
Investigating Warnings & Issues
Issues, warnings, and opportunities can be viewed in the top-right pane, by clicking on the ‘Issues’ tab. Here’s a quick summary of the different issue types:
- Issues are an error that should ideally be fixed.
- Warnings are things that could be an issue if they have been incorrectly configured.
- Opportunities are areas for optimisation.
These are categorised by high, medium, and low priority, with the highest priorities shown at the top. You can also filter this tab based on the type – you may only be interested in genuine issues, and not want to see the warnings and opportunities, for example.
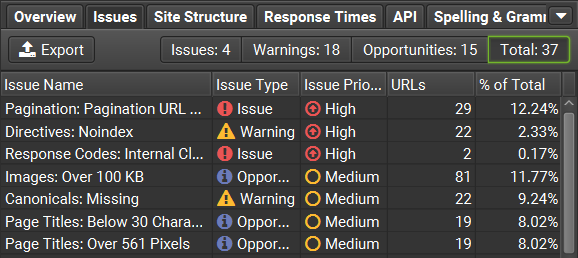
By clicking on each item, the relevant flagged data will show in the top-left pane. In the bottom-right pane, you can read a description of the issue or view a graph of the issue. This enables you to see any potential issues at a glance and identify the exact cause of these issues/warnings.
For example, ‘Directives: Noindex’ comes up as a warning with a high priority. This is telling you which pages are set as ‘noindex’ and will not appear in search results. It is a warning because pages can rightfully be set as ‘noindex’, therefore it isn’t classed as an issue, but it is something that needs checking to ensure they are correct. It is a high priority because if a page has been incorrectly marked as ‘noindex’, this could have negative consequences for your site.
Common Issues to Look For
When reviewing the Page URLs, title tags, and meta descriptions, you can select the URL row and then in the bottom-left pane select the ‘SERP Snippet’ tab. You can see how your page would appear in search engine results pages, as well as amending the title and description directly in Screaming Frog, to gain instant feedback about how this looks, as well as how this conforms to pixel limits. Check out the section on SERP mode to learn about how this mode can help with page titles and meta descriptions.
Page URL: assessed using the ‘URL’ tab, ideally the URL should be less than 115 characters. Avoid using underscores, spaces, or uppercase letters. If your URLs have parameters (often used with YouTube and eCommerce sites that use filters), these will be flagged in Screaming Frog as a warning – it’s fine to have parameters, so long as your pages have a canonicalised version.
Title tags: using the ‘Page Titles’ tab, review the pages to ensure your keyword appears in the title tag where relevant and isn’t a duplicate of any other pages. If your pages have duplicate title tags but shouldn’t be changed, you should canonicalise them. For best practice, your title tags should be between 200 and 561 pixels (around 30 to 60 characters).
Meta Descriptions: viewed in the ‘Meta Descriptions’ tab, ensure that there is a description present for every page. Make sure they aren’t duplicated across pages, and check that their length falls between 400 and 985 pixels (around 70 to 155 characters).
Heading 1 (H1): using the ‘H1’ tab, check the headers to ensure there aren’t any duplicates (unless it’s due to pagination), and ideally that there is only one H1 per page. Ideally, your H1 should contain your focused keyword where possible. If you have a blog or news section on your site, a great example would be to put the name of the article as the H1, to ensure it is unique and contains your keywords, and put ‘Blog’ or ‘Latest News’ as your H2.
Images: using the ‘image’ tab to review your site’s images, it’s best practice to avoid large file sizes (generally over 100kb) as this can slow down a website. It’s also a good idea to ensure your images have appropriate alt text, to describe the visual elements of your site to users who use screen readers.
Internal Links: by reviewing the ‘response codes’ tab, you can see which URLs were a success (2xx) or are a redirect (3xx). Avoid redirect chains (where pages redirect to another redirected page), and also try to avoid links to ‘noindex’ or low-importance pages.
Configuring your Screaming Frog
UX (User Experience)
Screaming Frog comes with two colour themes: light and dark. You can change your theme by going to Configuration > User Interface > Theme.
Version 17.0 was released in August 2022, showing a variety of new features, including detachable tabs. By right-clicking on any tab, and selecting ‘detach’, the individual tab opens in a new window.
As well as detaching tabs, you can configure tabs to be shown/hidden from view. Simply right-click on a tab and select ‘Configure Tabs’. Alternatively, click on the small downward arrow that appears to the right of the row of tabs, and deselect the tabs you wish to hide. You can also drag and reorder the tabs to your liking. You can reset the tabs back to default at any time by right-clicking on the tab row and selecting ‘Reset Tabs’.
Columns can also be reordered by dragging the column header to your desired location. To reset columns, go to Configuration > User Interface > Reset Columns for All Tables. You can also hide columns by clicking the small ‘+’ symbol to the right of the columns within the top-left pane.
These column changes are represented via exported reports. If you hide columns in the Screaming Frog interface, the hidden columns will not appear within reports. Equally, if you reorder the columns in Screaming Frog, they will export in that order. This is something to bear in mind if you use automated reports or report templates, as the data will be shifted around based on these configuration changes.
Configuration
The configuration options within this tool are so in-depth, Screaming Frog have created an incredibly lengthy user guide about the SEO Spider Configuration. In this article we’ll cover a few of the basics to help you get started. All configuration can be accessed within the Configuration option along the top of the screen. It is broken down into different areas, to help you navigate your way around these settings.
Within Configuration > Spider, you can dictate which items to crawl or store, what data to extract from pages, set various limits relating to crawl depth, and set advanced functions such as respecting ‘nofollow’.
By setting preferences in relation to character and pixel limits for various meta fields, you can determine the filter categories for each tab. Changing the maximum pixel width of page titles will determine whether certain pages are flagged as being too long or too short.
Here’s a brief run-through of the rest of the configuration sections, and what they are used for:
- Content: these settings allow you to enable near duplicate checks and spelling & grammar checks. You can also specify the HTML elements, classes and IDs that are used for word count, near duplicate content and spelling & grammar checks.
- Robots.txt: settings around how the SEO Spider treats robots.txt in terms of respecting, ignoring or showing blocks URLs.
- URL Rewriting: this allows you to alter the way that URLs show in the crawl results, such as by removing session IDs, pagination, and modifying parameters.
- CDNs: allows you to determine a list of Content Delivery Networks to be treated as ‘internal’ URLs.
- Include: control the URLs that are crawled by using a partial regex matching. The SEO Spider will only crawl URLs that it can find that contain the terms included.
- Exclude: the inverse of Include, the exclude settings allow you to use partial regex matching to determine which pages will be excluded from the crawl.
- Speed: control the speed at which the SEO Spider requests URLs. This is capped at 5 threads to avoid overloading servers but can be configured.
- User-Agent: switch the user agents used by the SEO Spider when making HTTP requests.
- HTTP Header: allows you to input custom header requests, such as setting cookies and referrers.
- Custom: the Search sub-menu item allows you to search for anything in the website’s source code. Extraction allows you to collect data from the HTML of a URL. Link Positions allows you to configure the classification of link positions on a page.
- API Access: this is where you can configure the integrations of particular products such as Google Analytics, Google Search Console, Majestic, Ahrefs and Moz integrations.
- Authentication: this allows you to crawl pages behind a login page by entering the required credentials.
- System: system-related configuration, such as memory allocation, storage mode, proxy server settings, and language settings.
Saving Configurations
For all changes that have been made within the Configuration options tab, you can save these settings as the default for your device by going to File > Configuration > Save Current Configuration as Default. If you ever want to revert back to the original, you can choose Clear Default Configuration found in the same menu.
You can also save these configuration settings as a file by going to File > Configuration > Save As. This will save as a ‘.seospiderconfig’ file. These could be saved and shared with colleagues, who can then load the configuration file on their workstations and instantly access your configured settings. Note that this does not save any crawl data, nor the set-up of your tabs and columns.
Crawl Modes
Within Screaming Frog, there are four different modes you can use to run a crawl that achieves different outputs. These can be changed by using the options at the top of the screen and selecting Mode.
Spider Mode
This is the default mode of Screaming Frog. Running a crawl in this mode will take the URL that you provide, and follow any links available from that original URL. It creates a spider of links, as each page links to more pages. The data is then populated in the relevant tabs along the top of the window.
List Mode
In list mode, instead of creating a spider of linked URLs, you provide a list of URLs and the software will only crawl the ones provided. To provide the URLs, you can upload a file (.csv, .txt, .xls, .xlsx, or .xml) or paste in a list of URLs manually.
List mode automatically sets a few configuration options, but you can change these if you wish. The most obvious setting is the crawl depth limit. This defaults to zero, meaning that only the URLs provided will be crawled. If you want to crawl the available links (which create a spider of URLs), you can change this setting in Configuration > Spider within the Limits tab.
When the data is exported, the rows are in the same order that the URLs were uploaded. List mode offers so many more features – check out Screaming Frog’s guide on how to use list mode.
SERP Mode
SERP mode is used for reviewing page titles and meta descriptions rather than crawling URLs to extract data. Upload a file that contains the URLs, page titles and meta descriptions you would like to review.
The data requires a header row, otherwise, you will receive the following error:
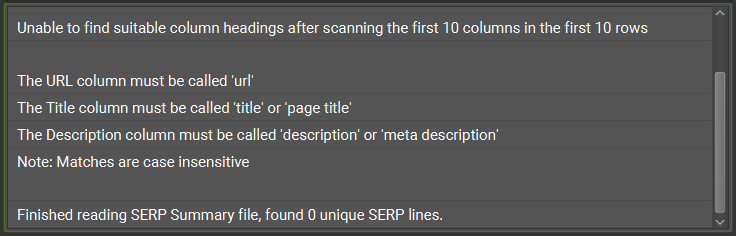
Once successfully loaded, Screaming Frog will show you the character counts and pixel widths of your page titles and meta descriptions. The URL is used as a unique identifier across the two tabs.
Select a row to view more detail in the SERP snippet in the bottom-left pane, where you can see character and pixel lengths. This allows you to review and experiment with the wording and how this would appear in the SERPs, without the lengthy trial and error of making direct changes to your website. There are additional settings for viewing the snippet on different device types, highlighting keywords, entering a description prefix, or seeing how a Rich Snippet would appear.
Once you have finished making amendments to your page titles and meta descriptions, you can export the data via Reports > SERP Summary. This extracts the same data format as that which was uploaded but includes your amendments.
Compare Mode
Compare mode allows you to upload two saved crawls and compare the changes in data. This mode is only available within database storage mode with a paid licence. To change storage mode, go to Configuration > System > Storage Mode and choose Database Storage from the dropdown. Rather than using your device’s RAM, the crawl data will be automatically saved to disk, allowing you to crawl much bigger sites that your RAM would be unable to manage.
To use compare mode, you will need to select two database files. These need to be the automatic database files that are saved, rather than the ‘.seospider’ files that you can manually save when in Memory Storage mode. The cog over on the right-hand side is used to configure which additional items you would like to check for change, such as page titles, word count, inlinks, and so on.
After the crawl has run, you can click on the items in the top-right pane to view the comparison in more detail. There are four columns that are not present in Spider or List Mode, that are used for the comparison across the tabs and filters:
- Added: URLs from the previous crawl that now appear in that filter in the current crawl.
- New: URLs that don’t exist in the previous crawl, that now exist in the filter of the current crawl.
- Removed: URLs that were in the filter of the previous crawl, that no longer sit within that filter.
- Missing: URLs from the previous crawl that cannot be found in the current crawl.
For further details, check out the Screaming Frog guide about how to compare crawls.
Useful Things to Discover with Screaming Frog
Aside from the basics of running crawls and reviewing the issues list, there are many features within Screaming Frog that you can use that you may not be aware of.
Spelling & Grammar Checks
Disabled by default, Screaming Frog can be used to run spelling and grammar checks on your URLs.
Configuring Spelling & Grammar Checks
To enable spelling & grammar checks, select Configuration > Content > Spelling & Grammar. Here you can specify the language/country to use, as well as which grammar rules to enable/disable. You can right-click and select ‘Ignore grammar rule’ on individual grammar issues identified in a crawl.
You can also set spellings to ignore. By using the Ignore tab, this saves the words/phrases for that particular crawl, whereas if you use the Dictionary tab, this saves the words/phrases and applies them to all crawls. You can right-click and select ‘ignore all’ on individual spelling issues discovered during a crawl.
You can specify the content area used for spelling & grammar checks by selecting Configuration > Content > Area. Depending on the website’s setup, you can specify the HTML elements, classes and IDs to include/exclude within the spelling & grammar check. For example, the ‘nav’ and ‘footer’ are excluded by default, but your website may have ‘header’ or ‘contact’ sections that you want to exclude.
Running Spelling & Grammar Checks
You can run spelling & grammar checks on existing crawls, or run a new one. If you are using Database Storage Mode, you can load an existing crawl, update the configuration to enable spelling & grammar checks, and then perform the check on the existing crawl data. You can do this by selecting the Spelling & Grammar tab in the top-right pane, and selecting the refresh button to run the check.
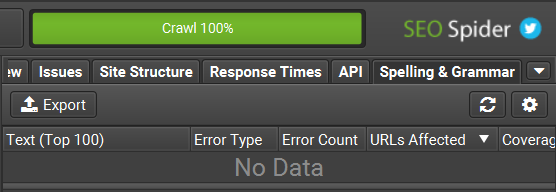
This tab will show you the top 100 unique errors discovered. Each row will show the text in question, the number of instances of the error across the site, and a brief explanation for the spelling/grammar error.
To view these errors in more detail, use the Content tab in the top-left pane, and use the filter to view Spelling Errors and Grammar Errors. You can click on a row and then use the Spelling & Grammar Details tab in the bottom-left pane, to view more information. Clicking on each row in the bottom-left pane will show you the exact section of text where this error appears, to provide you with more context.
If an error is to be dismissed, such as the name of a person or a company, you can select the error in the top-right pane and right-click and ‘ignore’. Once you click the refresh button, it will re-run the spelling & grammar crawl and those ignored errors will no longer appear.
You can also export spelling & grammar errors to a spreadsheet – different reports are created when exported from different areas of Screaming Frog. If you use the export in the top-right pane, it will export one row per type of error – if that particular error appears five times across your website, it only exports one row, with one sample URL. If you use the export in the top-left pane, next to the filter, it exports either the spelling or grammar errors, depending on which filter you have selected. This export gives you each URL where an error is present, however, it does not provide you with the context of the error – if it is a spelling error, it does not tell you what the offending word is, nor where to find it in the text. Therefore, if you are looking to correct spelling & grammar errors across your website, it may be easier to check these directly in Screaming Frog instead of cross-referencing the exports.
Take a look at the Screaming Frog tutorial for an in-depth look into how to spell & grammar check your website.
Duplicates & Near Duplicates
Screaming Frog will automatically check for exact duplicate pages, and return these results in the Overview tab. However, you may wish to check for near duplicates, for pages that largely have similar content, such as area pages for your business. Pages that are very similar can cause ranking issues, where web crawlers need to decide which version to show in the search engine results.
To enable near duplicates, select Configuration > Content > Duplicates. Tick the box for ‘enable near duplicates’ and set a similarity threshold. This defaults to 90%, but you can change this to be from 20% to 100%. You could set this as 90% to begin with, and then tweak the similarity threshold as desired, to refine the results. The box for ‘Only Check Indexable Pages for Duplicates’ is selected by default. With this ticked, if you have two versions of a page and one is canonicalised to the other and therefore non-indexable, it will not be reported.
You can also specify the content area of your website that should be compared by selecting Configuration > Content > Area. This allows you to set particular parts of the page to be included or excluded based on your site’s HTML. This ensures that the duplicate comparison only looks at the relevant areas of the page.
Once you have finished running your crawl, you will need to run a crawl analysis before the results are available. Select Crawl Analysis from the top menu bar, and select Start. Once complete, view the exact and near duplicates in the ‘Content’ tab in the top-left pane. You can view the results in more detail by using the ‘Duplicate Details’ tab in the bottom-left pane. Here you can select a URL and make a visual comparison of the two pages, where the changes are highlighted in red/green for removals/additions respectively.
You can export the results via Bulk Export > Content > Near Duplicates.
Further Learning Resources
We hope you’ve found this guide useful as an introduction to Screaming Frog. Our digital team is experienced in running Screaming Frog audits for our clients – if you have any questions, please get in touch.
Take a look at the following resources for further information about the Screaming Frog SEO Spider:
Posted in Advice